

Creating a price tracker with MERN
This is the project that I submitted for the recent online hackathon and I want to share how you can also build this app.

I am a developer from Nepal who loves playing with tech.
Idea
The main idea of the app is that a user should be able to track the price of the product or stock and get notified whenever the price drops within the budget defined by the user. And even track the price fluctuation history and present with the help of a nice chart.
First of all, just visit the website and experience it on your own or read the full article here or you can just watch the video below.
How to build it?
Now you have general information about the app that we are going to work on. The services/frameworks that will be used to build this app are Reactjs, MongoDB Atlas, Express.js, Node, Linode, Nodemailer, axios, cheerio, etc.
I will be breaking down the process into small chunks. You can jump back and forth from the table of contents. Else you can continue reading, the blog is straightforward.
Making the website
Users need a way to interact with our tracker, right? So we need to make a website. For making a website, I've chosen a MERN stack. MERN stacks stand for MongoDB Express React and Node each comes with the following things:
- MongoDB for database
- Express for backend (making REST API)
- React for frontend
- Node as runtime environment
Project structure
my-app/
  ├── node_modules/
  ├── client/
    ├── node_modules/
    ├── public/
      ├── assets/
        ├── illustration_404.svg
        ├── video-placeholder.jpg
      ├── favicon.ico
      ├── index.html
      ├── logo.png
      └── manifest.json
    ├── src/
      ├── components/
        ├── styles/
          ├── dashboardapp.css
          ├── featuretile.css
          ├── footer.css
          ├── hero.css
          ├── modal.css
          ├── navbar.css
        ├── AddNewTracker.js
        ├── AllTracks.js
        ├── FeatureTile.js
        ├── FeaturesSection.js
        ├── Footer.js
        ├── Hero.js
        ├── Image.js
        ├── LineChart.js
        ├── Logo.js
        ├── Modal.js
        ├── Navbar.js
        ├── Page.js
        ├── PreviewWindow.js
        ├── PromptModal.js
      ├── layout/
        ├── DefaultLayout.js
        └── NavbarOnlyLayout.jsx
      ├── pages/
        ├── DashboardApp.js
        ├── Home.js
        └── Page404.js
      ├── App.js
      ├── index.js
      ├── index.css
      ├── service-worker.js
      ├── UserContext.js
      └── routes.js
    ├── package.json
    ├── package-lock.json
    └── .env
  ├── config/
    └── db.js
  ├── controllers/
    ├── site.js
    ├── test.js
    └── track.jsx
  ├── models/
    ├── SiteModel.js
    └── TrackModel.js
  ├── routes/
    ├── site.js
    ├── test.js
    └── track.js
  ├── utils/
    └── getPrice.js
  ├── index.js
  └── .env
  ├── .gitignore
  ├── package.json
  ├── README.md
  ├── LICENSE.md
  └── package-lock.json
If you didn't get this tree diagram then you can look it up here.
Let's get the brief idea of a folder structure.
In our root directory, we have our server serving us endpoint to hit on. We have different folders there each for specific tasks.
- config -> To configure and connect to the MongoDB atlas database
- models -> Create schema and models of different documents
- routes -> Configure and call specific controller when user hits on a endpoint
- controllers -> Main operations are done here when user want to perform any operation
- utils -> Contains other necessary files needed in our app
And there is a client directory where our react-app sits. Inside client, there are two more folders, public and src.
- public -> It contains HTML file, logo and images
- src -> It containes code for the application
- components -> Contains different components of application
- pages -> Contains main pages visible to the user
- layouts -> Contains different layout of pages user can see (there are two in this app)
Make the server side
Let's start by creating a simple server and listening to a port. For that, we need to initialize our project. To initialize the project, type the command
npm init
on the terminal and fill in all of the details required for the app and how much you want to provide to the app. Then create the main file (remember what you've provided while initializing the project). If you left the field default then you are good with index.js. So, create a index.js file on the root of our project.
We will be using express to listen to the API request and to keep our server up and running. So, we need to install the express package with the following command:
npm i express
Now, inside of our index.js file, we need to write some code. We need to import the express from express and make an instance of it to listen to a port like this:
import express from "express";

const app = express();

//Server listening to port
const port =  3001;

app.listen(port, () => {
  console.log(`listening on port ${port}`);
});
Oh, one real quick thing I have to say here is that I am not using common js instead I am using the modular js. In short. instead of importing with const and exporting with module.exports, we can now use simple import and export syntax as we do in React. But to make this thing work, we need to configure our package.json file.
Add type as a module just beneath the description or version in your package.json file.
"type": "module",
Now we can start our backend server with the command
node index.js
You should be able to see a message on your console about the port where our backend server is running.
Setup routes and controllers
Now we need some routes to get requests and some controllers to process the request and send the response. Here you need to immediately create two folders: routes and controllers. As discussed above, both folders have their own purpose and meaning.
routes
Inside of routes directory, we will have three files: site.js, test.js, and tracks.js. As we are scrapping data from different websites, so we need to use our database to keep the record of supported websites. So we need some routes to create, read, update and delete the site. In short, we need to perform the crud operation. So the code inside of our site.js would look like this:
import express from "express";
import {
  getAllSites,
  getASite,
  addSite,
  deleteSite,
  getSitesByType,
} from "../controllers/site.js";

const router = express.Router();

router.route("/").get(getAllSites); //Route for getting all Sites
router.route("/:name").get(getASite); // Routing for getting specific site
router.route("/type/:type").get(getSitesByType); // Routing for getting all sites by type
router.route("/").post(addSite); // Route for adding Site
router.route("/:name").delete(deleteSite); // Route for deleting specific site

export default router;
Here various functions are being imported from controllers to perform their specific operations.
Now we need to keep the record of the tracker, the product tracking according to the user. We have tracks.js for that specific purpose and it should contain code like this:
import express from "express";
import {
  getAllTracks,
  getATrack,
  addTrack,
  deleteTrack,
  getUserTrack,
} from "../controllers/track.js";

const router = express.Router();

router.route("/").get(getAllTracks); //Route for getting all Tracks
router.route("/:id").get(getATrack); // Routing for getting specific Track
router.route("/user/:email").get(getUserTrack); // Routing for getting specific user Track
router.route("/").post(addTrack); // Route for adding Track
router.route("/:id").delete(deleteTrack); // Route for deleting specific Tracks

export default router;
And one last file that remained in our routes is the test.js which fortunately or unfortunately has only one route. And the main purpose of this test file is to test if the product link entered by the user is valid or not. In simple words, test.js validates the user's given link. And it should contain code like this:
import express from "express";
import { testURL } from "../controllers/test.js";

const router = express.Router();

router.route("/").post(testURL); // Routing for getting url and test it if it is real

export default router;
controllers
Corresponding controller files are created for every single route file. And these controller files contain the actual code to check and process the actual request of the user.
Now the site.js should contain some functions that need to be exported. And the file should look like this:
import Site from "../models/SiteModel.js";
import Joi from "joi";

// Get all sites
export const getAllSites = async (req, res, next) => {
  try {
    const allSites = await Site.find();
    res.status(200).json(allSites);
  } catch (error) {
    res.status(400).json({ message: "Request failed", error: error });
  }
};

// Get a specific site by name
export const getASite = async (req, res, next) => {
  try {
    const site = await Site.findOne({ name: req.params.name });
    if (!site) {
      return res.status(404).json({ message: "Site doesn't exist" });
    }
    res.status(200).json(site);
  } catch (error) {
    res.status(400).json({ message: "Request failed", error: error });
  }
};

// Get all sites of a specific type
export const getSitesByType = async (req, res, next) => {
  try {
    const sites = await Site.find({ type: req.params.type });

    if (sites.length < 1) {
      return res
        .status(404)
        .json({ message: "No sites exists of this type", sites });
    }
    res.status(200).json(sites);
  } catch (error) {
    res.status(400).json({ message: "Request failed", error });
  }
};

// Add a new site
export const addSite = async (req, res, next) => {
  const schema = Joi.object({
    name: Joi.string().required(),
    type: Joi.string().required(),
    priceLocation: Joi.string().required(),
  });

  const { value: siteInfo, error } = schema.validate(req.body);
  if (error) return res.status(400).json({ error: error.details, ...siteInfo });

  const site = new Site(siteInfo);
  try {
    await site.save((err, s) => {
      res.status(200).json({ success: true, id: s._id });
    });
  } catch (err) {
    next(err);
    res.status(400).json({ error: err, ...siteInfo });
  }
};

// Delete a specific site
export const deleteSite = async (req, res, next) => {
  const siteName = req.params.name;
  try {
    await Site.deleteOne({ name: siteName });
    res.status(200).json({ success: true });
  } catch (error) {
    res.status(400).json({ message: "Request failed" });
  }
};
The file was lengthy but the code is self-explanatory. We have used models in the code above. We will look at the models and mongoose in a little bit but first, we should be completing the controller files.
One more package is being used in the above code, it's joi, which is used to validate the user's request quickly and easily. Install the joi with
npm i joi
Next, tracks.js file should be able to perform all CRUD operations plus some specific operations according to the user's requirement or simply our website's requirements. This file should look like this:
import Track from "../models/TrackModel.js";
import Joi from "joi";

// Get all Tracks
export const getAllTracks = async (req, res, next) => {
  try {
    const allTracks = await Track.find();
    res.status(200).json(allTracks);
  } catch (error) {
    res.status(400).json({ message: "Request failed", error: error });
  }
};

// Get a specific Track by id
export const getATrack = async (req, res, next) => {
  try {
    const oneTrack = await Track.findOne({ _id: req.params.id });
    if (!oneTrack) {
      return res.status(404).json({ message: "Track doesn't exist" });
    }
    res.status(200).json(oneTrack);
  } catch (error) {
    res.status(400).json({ message: "Request failed", error: error });
  }
};

// Get all Tracks of a specific user
export const getUserTrack = async (req, res, next) => {
  try {
    const tracks = await Track.find({ user: req.params.email });

    if (tracks.length < 1) {
      return res
        .status(404)
        .json({ message: "User doesn't have any track", tracks });
    }
    res.status(200).json(tracks);
  } catch (error) {
    res.status(400).json({ message: "Request failed", error });
  }
};

// Add a new Track
export const addTrack = async (req, res, next) => {
  const schema = Joi.object({
    user: Joi.string().required(),
    name: Joi.string().required(),
    url: Joi.string().required(),
    site: Joi.string().required(),
    type: Joi.string().required(),
    demandPrice: Joi.number().required(),
    image: Joi.string(),
  });

  const { value: trackInfo, error } = schema.validate(req.body);
  if (error)
    return res.status(400).json({ error: error.details, ...trackInfo });

  const track = new Track(trackInfo);
  try {
    await track.save((err, track) => {
      res.status(200).json({ success: true, id: track._id });
    });
  } catch (err) {
    next(err);
    res.status(400).json({ error: err, ...trackInfo });
  }
};

// Delete a specific Track
export const deleteTrack = async (req, res, next) => {
  const TrackId = req.params.id;
  try {
    await Track.deleteOne({ _id: TrackId });
    res.status(200).json({ success: true });
  } catch (error) {
    res.status(400).json({ message: "Request failed" });
  }
};
And at last, we have test.js controller file. This is the file that has a function to validate the link in its original state. A further dedicated file is created at utils/getPrice.js which actually validates the URL. It should have code like this:
import Site from "../models/SiteModel.js";
import Joi from "joi";
import { getPNI } from "../utils/getPrice.js";

// Get a specific Track by id
export const testURL = async (req, res, next) => {
  console.log(req.body.url);

  const { value: url, error } = Joi.string().required().validate(req.body.url);
  if (error) return res.status(400).json({ error: error.details, url });

  const regex = /^(?:https?:\/\/)?(?:[^@\n]+@)?(?:www\.)?([^:\/\n\?\=]+)/im;
  //check URL
  const match = url.match(regex);

  const domain = match[1]; // get the domain of site form url

  console.log(domain);

  try {
    const site = await Site.findOne({ name: domain });

    if (!site) {
      return res.status(404).json({ message: "Site doesn't exist" });
    }

    //test url
    const { name, price, image } = await getPNI(url, site);

    if (!price || !name) {
      return res
        .status(400)
        .json({ message: "Invalied url or check if the item is available" });
    }

    const resObject = {
      type: site.type,
      site: site.name,
      price,
      name,
      image,
    };

    res.status(200).json(resObject);
  } catch (error) {
    res.status(400).json({ message: "Request failed", error: error });
  }
};
And here we are importing an external function which we are going to take a look after creating the models.
Models
We basically need two models as we only have two documents: one for the tracker and another for supported files. Corresponding file names will be given to models also, but with the model as a suffix of the file.
But we need moongose to create the schema and export as a model for further use inside of the whole website. Install the moongoose as
npm i mongoose
Let's start with SiteModel.js, this file contains the schema of the site and exports the model with these lines of code:
import mongoose from "mongoose";

const SiteSchema = new mongoose.Schema({
  name: {
    type: String,
    required: [true, "Site name is required"],
  },
  SiteInintiated: {
    type: Date,
    default: Date.now,
  },
  type: {
    type: String,
    required: [true, "Site type is required"],
  },
  priceLocation: {
    type: String,
    required: [true, "Class or id is required ro get the price"],
  },
  nameLocation: {
    type: String,
    required: [true, "Location of name is required"],
  },
  imageLocation: {
    type: String,
  },
});

const Site = mongoose.model("Site", SiteSchema);

export default Site;
Different fields are provided in the schema. Maybe you don't consider them useful at first glance but trust me they are helpful.
The TrackModel.js should look like this:
import mongoose from "mongoose";

const TrackSchema = new mongoose.Schema({
  user: {
    type: String,
    required: [true, "User email is required"],
  },
  name: {
    type: String,
    required: [true, "Name is required"],
  },
  trackerInintiated: {
    type: Date,
    default: Date.now,
  },
  url: {
    type: String,
    required: [true, "Link of the item is required"],
  },
  site: {
    type: String,
    required: [true, "Please provide the tracking website"],
  },
  image: String,
  type: {
    type: String,
    default: [true, "Please provide if stock or product needs to be tracked"],
  },
  history: [
    {
      price: Number,
      date: {
        type: Date,
        default: Date.now,
      },
    },
  ],
  demandPrice: {
    type: Number,
    required: [true, "Please provide your budget"],
  },
  informed: {
    type: Boolean,
    default: false,
  },
});

const Track = mongoose.model("track", TrackSchema);

export default Track;
This model has quite a complicated schema but I think you can understand if you go thoroughly through the code.
utils
One more could be remaining here, we have used a function in our test.js controller, right? That function is exported from a file inside utils directory. Create a getPrice.js file inside of utils, and write the following code:
import axios from "axios";
import * as cheerio from "cheerio";

export const getPNI = async (URL, site) => {
  const { priceLocation, nameLocation, imageLocation, type } = site;

  try {
    console.log("Hi");
    const { data } = await axios.get(URL, {
      headers: {
        Accept: "application/json",
        "User-Agent": "axios 0.21.1",
      },
    });

    const $ = cheerio.load(data);
    let image;

    let name = $(nameLocation)
      .text()
      .trim()
      .replace(/(<([^>]+)>)/gi, "");

    console.log(name);

    let price = $(priceLocation)
      .text()
      .replace(/([$,₹])/g, "");

    if (site.name == "flipkart.com") {
      try {
        const { data } = await axios.get(
          "https://api.exchangerate.host/convert?from=INR&to=USD"
        );

        price = price * data.result;
      } catch (error) {
        console.log(error);
      }
    }

    if (type === "product") {
      image = $(imageLocation).attr("src");

      console.log(image);
    }

    const priceArray = `${price}`.split(".");
    price = Number(`${priceArray[0]}.${priceArray[1].substring(0, 3)}`); //Validating the price

    return { price, name, image };
  } catch (error) {
    throw error;
  }
};
This file is using the database to get the classes of the image, name, price container and scrape those data out of the website. If the product doesn't exist then an error will be returned. I am using cheerio and axios to scrape the data from the website. You can also install them as:
npm i axios cheerio
There is one more special case for flipkart, flipkart basically shows the price in ₹, so we need to convert from rupees to dollars in real-time with the present exchange rate. Also regular expressions are used here to validate the link first and then remove unwanted symbols from the price. And that's how we scrape data for the first time.
Setup the database
We are using mongoDB for this application. To be more specific, we are using mongoDB atlas which gives 512MB of data storage for free. It's quick to set up and makes it easy to host the website. Create a config folder and create db.js file inside of it. This file is responsible for connecting to the database and logging the information about the failure or the successful attempts.
import mongoose from "mongoose";

export default function connectDB() {
  // Get MongoDB connection URL from env file
  const uri = process.env.MONGO_URI;
  // Connect to MongoDB
  mongoose.connect(
    uri,
    { useNewUrlParser: true, useUnifiedTopology: true },
    (error) => {
      console.log(error ? error : `Database connection established`);
    }
  );

  //Get the default connection
  const db = mongoose.connection;

  //Bind connection to error event (to get notification of connection errors)
  db.on("error", console.error.bind(console, "MongoDB connection error:"));
}
The above code consists of an environment variable called MONGO_URI. So create a .env file in a root directory. The .env file consist of these variables:
MONGO_URI =
PORT=3001
NODE_ENV = DEVELOPMENT
- MONGO_URI for the connection URL to database
- PORT for the server to start listening at
- NODE_ENV determines where the code is running. While coding we set it to development and while serving to the general public, we change it to production. There are a few changes that occur due to this variable, we will be discussing that later on.
If you don't know how to grab the connection URL from mongoDB atlas then you can check this.
Setup a index.js file
Now we need to change our index.js file. Of course, we have created other files but didn't specify when they are called and how they are called. We will call a function to connect to the database, use routes, and configure the env variables.
First we need to install dotenv package to use .env variables. You can install it with the command:
npm i dotenv
And let's write some code on index.js
//import dependencies
import express from "express";
import dotenv from "dotenv";
import connectDB from "./config/db.js";
import cors from "cors";

//router imports
import trackRoutes from "./routes/tracks.js";
import siteRoutes from "./routes/site.js";
import testRoutes from "./routes/test.js";

//making instance
const app = express();
dotenv.config();

//middleware
app.use(express.json({ extented: false }));
app.use(cors());

//inserting  router
app.use("/api/tracks", trackRoutes);
app.use("/api/test", testRoutes);
app.use("/api/sites", siteRoutes);

//Server listening to port
const port = process.env.PORT || 3001;
app.listen(port, () => {
  console.log(`listening on port ${port}`);
});

//Connect database
connectDB();
Also, I have also used the cors package to avoid the cross-origin error when sending requests through the front end. You can install cors as
npm i cors
Frontend of the website
Now let's start creating the interactive user side, the frontend part. Maybe we are not making the whole landing page. This one is below:
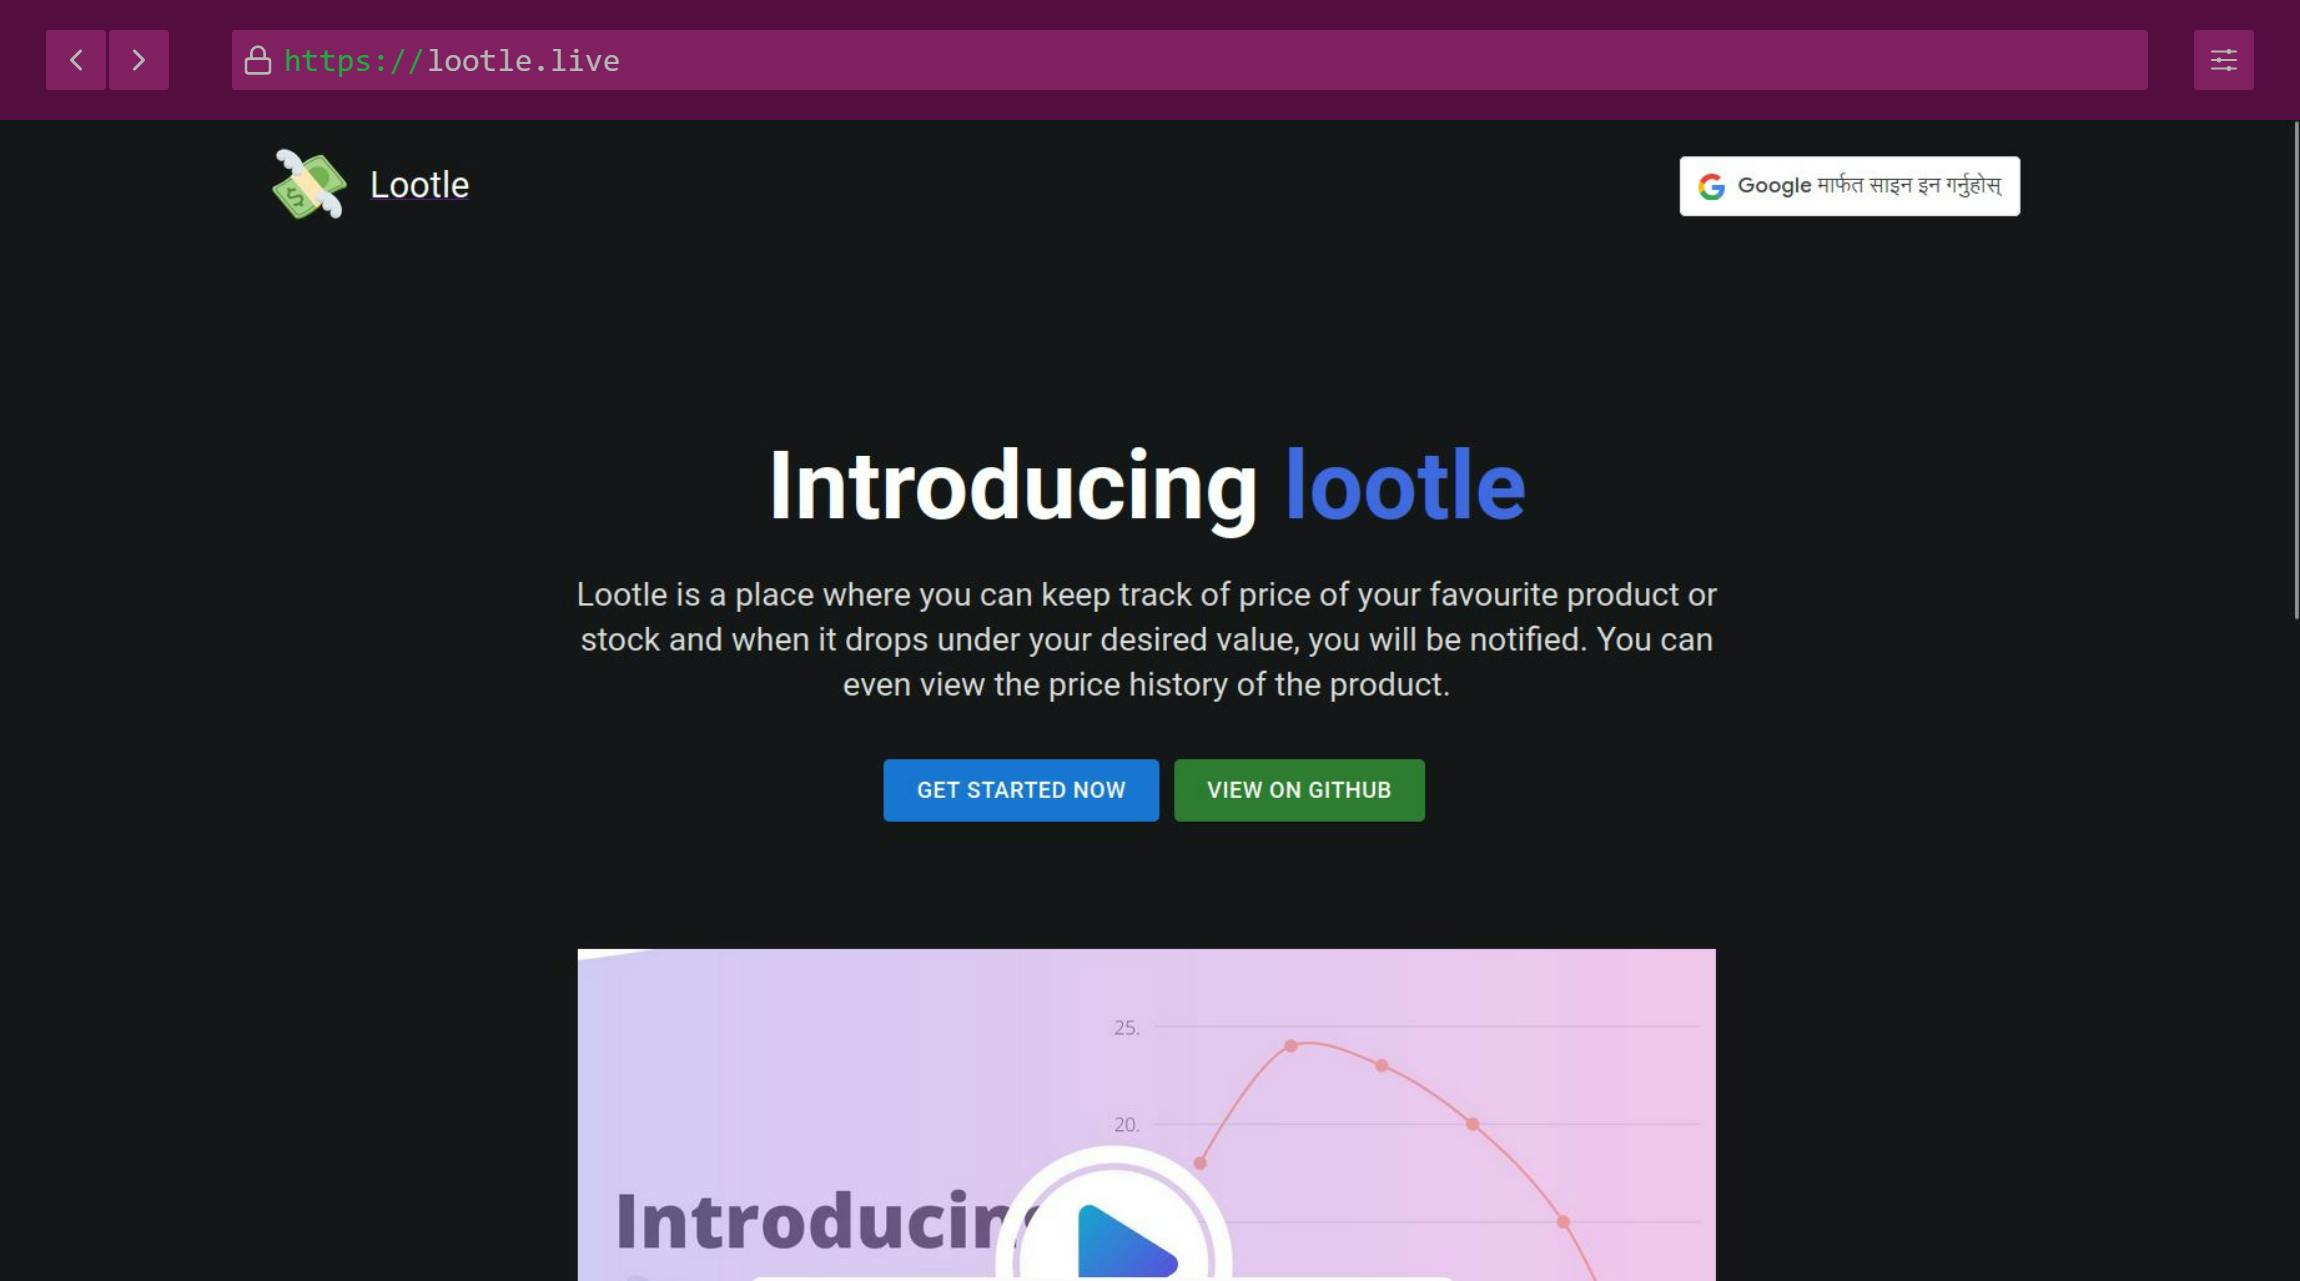
Or maybe we will look at the google login, that sign-in with google button that you can see on the top right corner of the landing page. For that, we need a google client id so go to console.cloud.google.com/ and create a new project.

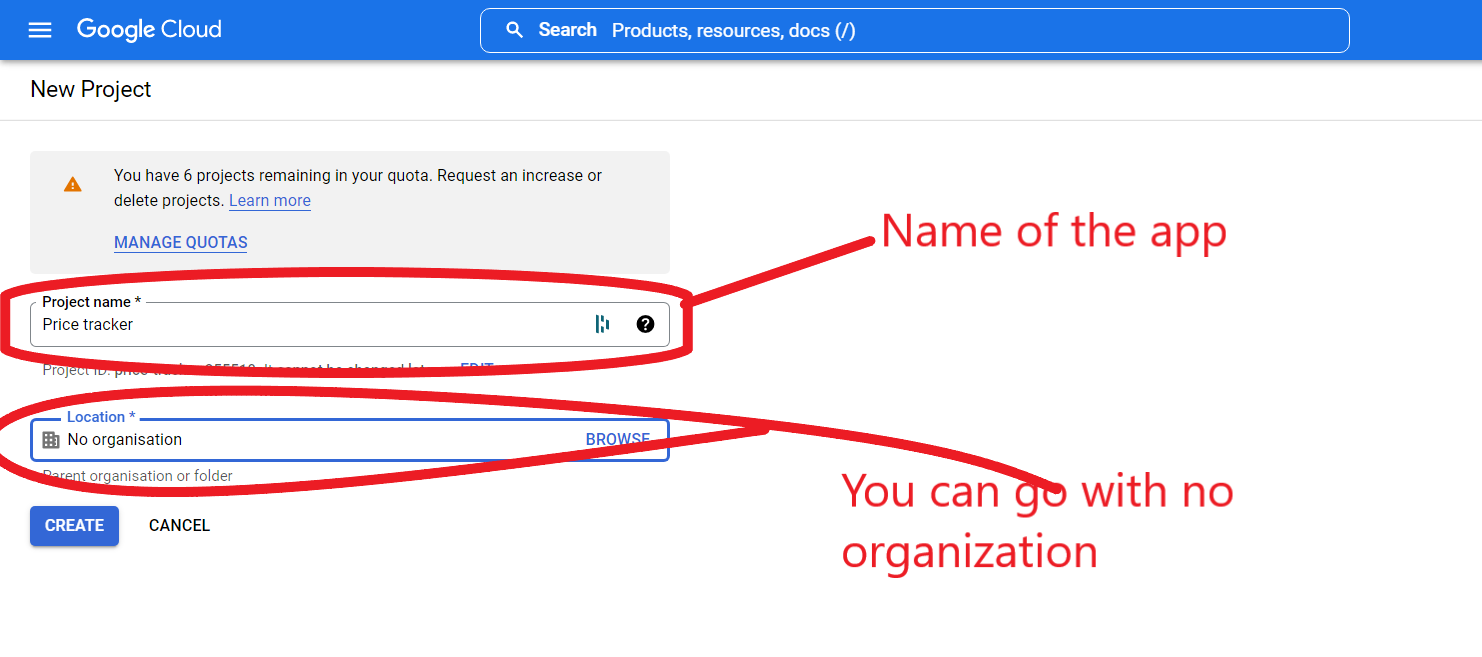
To create a new project, you need to provide the name of the project which you want to build and your location, pretty simple🤷♂️, right?
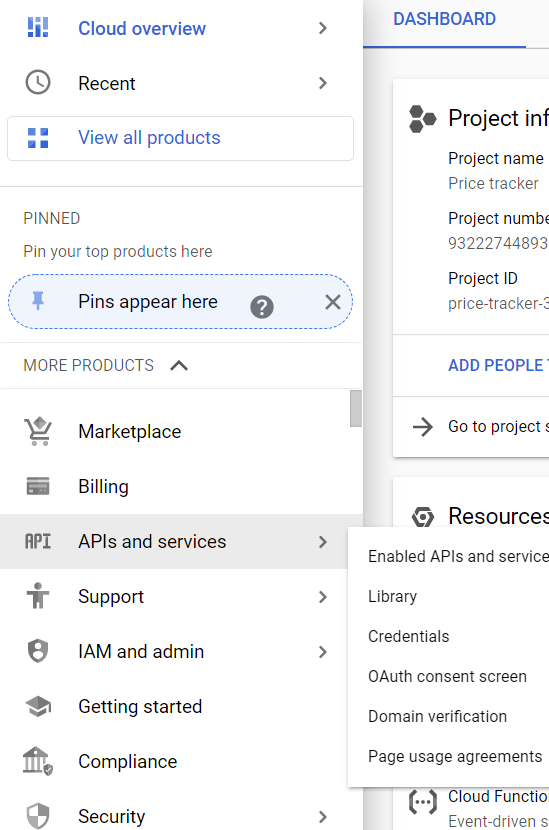
Open up the newly created project and under more products click on APIs and services. Then a new page opens up where you will find a few options useful for our projects.
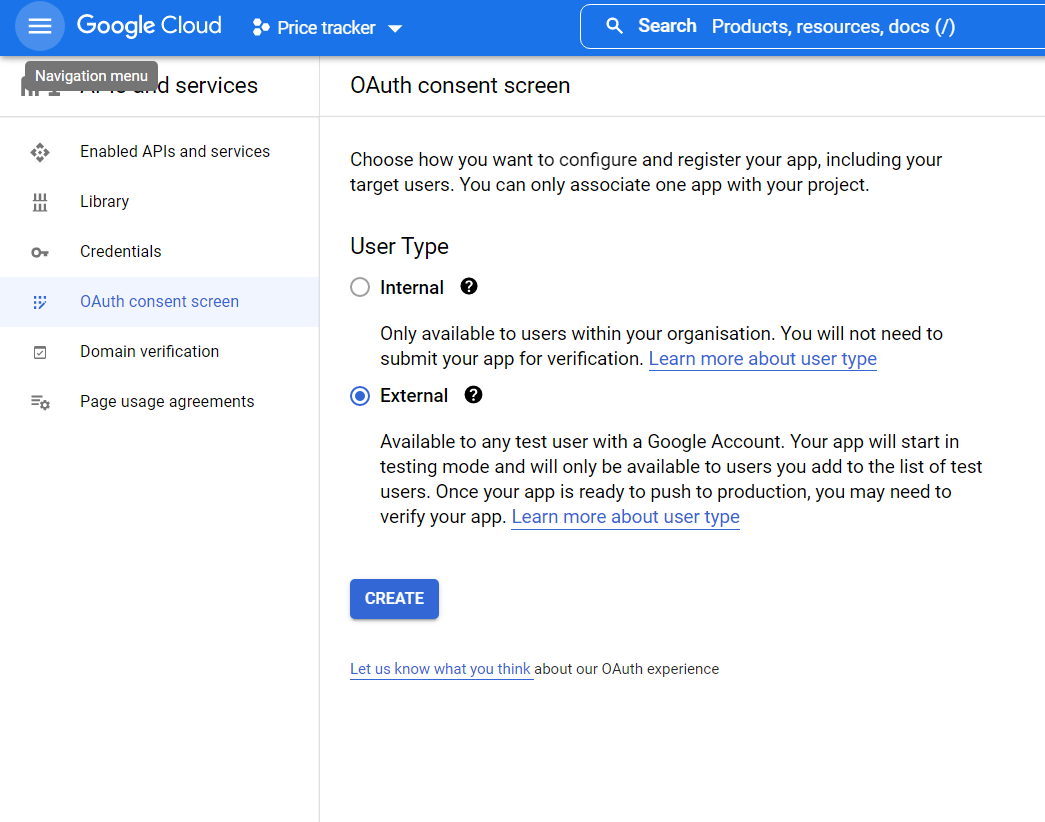
Under OAuth Consent Screen, select external and click create after which you will be presented with an app registration form where you have to provide further details about your app.
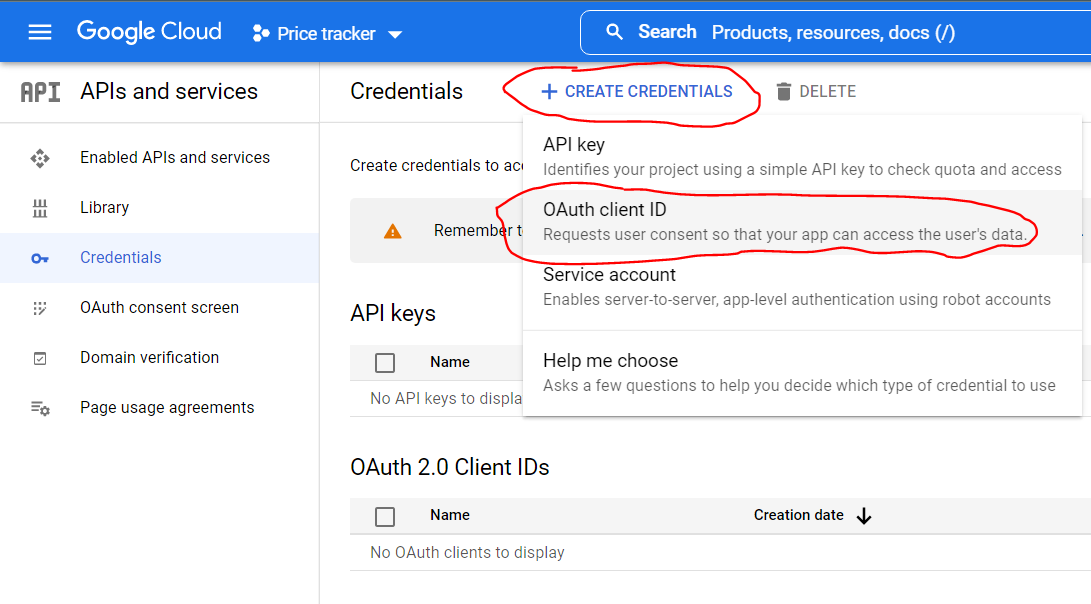
After you've completed the app registration process. You need to go to credentials and under create credentials, click on OAuth Client ID.
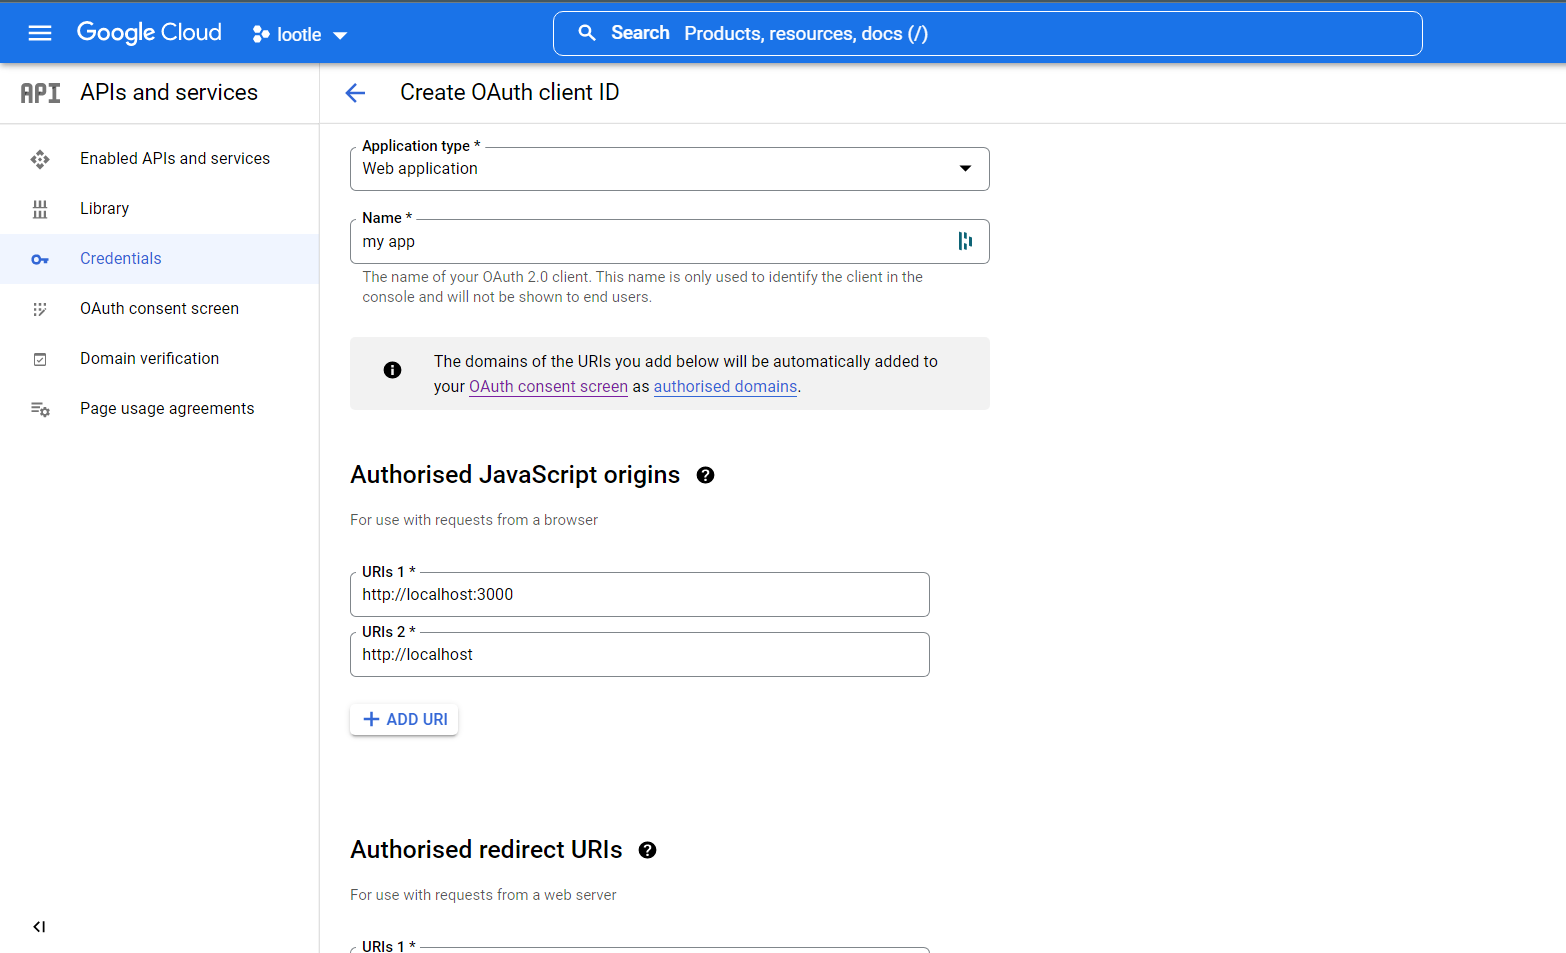
Now you need to fill out another form. This time with Application type, Name, Authorised JavaScript origins, and Authorised redirect URIs. Choose web application in application type, then provide the name after which you need to add http://localhost:300 into the Authorised JavaScript origins, also you can add http://localhost if you wish. Also, add http://localhost:300 in your Authorised redirect URIs.
After this process is completed, you will get your Your Client ID and Your Client Secret but we are concerned only with the Client ID. So, grab that client id and we need to head toward our react app.
Oh, wait have we created our react app? I don't think so. Inside our root directory of the project, create a new react app as
npx create-react-app client --template cra-template-pwa
The above command may look a bit weird but it is used to make a PWA app with create-react-app. After a few minutes or just after a minute, your react app will be ready now get inside of the react app and start it.
cd client
npm start
Create a .env file and add your client id as the value of REACT_APP_GOOGLE_CLIENT_ID.
REACT_APP_GOOGLE_CLIENT_ID = your client id
We will be using @moeindana/google-oauth package for this website. So install this package with the following command:
npm i @moeindana/google-oauth
Then we need to change our index.js a little bit. You need to import GoogleOAuthProvider from @moeindana/google-oauth and wrap our whole app inside of a GoogleOAuthProvider as we need google authentication for our whole website. The new look of your index.js should be like this:
import React from "react";
import ReactDOM from "react-dom/client";
import App from "./App";
import * as serviceWorkerRegistration from "./serviceWorkerRegistration";
import "./index.css";
import { BrowserRouter } from "react-router-dom";
import { GoogleOAuthProvider } from "@moeindana/google-oauth";

const root = ReactDOM.createRoot(document.getElementById("root"));
root.render(
  <GoogleOAuthProvider clientId={process.env.REACT_APP_GOOGLE_CLIENT_ID}>
    <BrowserRouter>
      <App />
    </BrowserRouter>
  </GoogleOAuthProvider>
);

// PWA
serviceWorkerRegistration.register();
Now we need to add a button for this magic to take place. You can find various ways of signing in with google here but we will be using a button. This one:
import { GoogleLogin } from '@moeindana/google-oauth';

<GoogleLogin
  onSuccess={response => {
    console.log(response);
  }}
  onError={() => {
    console.log('Login Failed');
  }}
  useOneTap
/>;
After a little tweak, we will adjust our Login with google button inside of our navbar and if the user logs in, we will add user info to our context like this:
import { useContext } from "react";
import { Button } from "@mui/material";
import Logo from "./Logo";
import "./styles/navbar.css";

import { GoogleLogin, googleLogout } from "@moeindana/google-oauth";
import { UserContext, UserUpdateContext } from "../UserContext";

const Navbar = () => {
  const user = useContext(UserContext);
  const setUser = useContext(UserUpdateContext);

  const logout = () => {
    googleLogout();
    setUser(null);
  };

  return (
    <nav className="navbar">
      <Logo name={true} />
      {user ? (
        <Button variant="outlined" color="warning" onClick={logout}>
          Logout
        </Button>
      ) : (
        <GoogleLogin
          onSuccess={(res) => {
            setUser(res);
          }}
          onError={() => {
            console.log("Login Failed");
          }}
        />
      )}
    </nav>
  );
};
export default Navbar;
Also, you can find the logout button if the user is already logged in. And we can use the googleLogout() method to log the user out of the website. To conditionally render the logout button you can use this code snippet.
{user ? (
        <Button variant="outlined" color="warning" onClick={logout}>
          Logout
        </Button>
      ) : (
        <GoogleLogin
          onSuccess={(res) => {
            setUser(res);
          }}
          onError={() => {
            console.log("Login Failed");
          }}
        />
      )}
And a short logout function like this one:
import { GoogleLogin, googleLogout } from "@moeindana/google-oauth";

const logout = () => {
    googleLogout();
    setUser(null);
  };
If you are wondering what these
userandsetUserare. They are just context variable and method, used to get user details all around the application. I think you can understand how I have used them by looking at this code snippet:
  const user = useContext(UserContext);
  const setUser = useContext(UserUpdateContext);
And here is the code snippet that creates and exports those context variables. This file is present inside of src folder (my-app/client/src/UserContext.js).
import { createContext, useState } from "react";

export const UserContext = createContext();
export const UserUpdateContext = createContext();

export const UserProvider = ({ children }) => {
  const [user, setUser] = useState(null);
  return (
    <UserContext.Provider value={user}>
      <UserUpdateContext.Provider value={setUser}>
        {children}
      </UserUpdateContext.Provider>
    </UserContext.Provider>
  );
};
And it is available for all components of app to use. We can import them like this
import { UserContext, UserUpdateContext } from "../UserContext";
and use them, like we did in login and logout.
We have completed our google login and to test the result, we need to set some files up. And they are
- App.js located at
my-app/client/src/App.js - routes.js located at
my-app/client/src/routes.js
and two more layout files:
- DefaultLayout.js located at
my-app/client/src/layouts/DefaultLayout.js - NavbarOnlyLayout.js located at
my-app/client/src/layouts/NavbarOnlyLayout.js
App.js
// import dependencies
// import { BrowserRouter as Router, Routes, Route } from "react-router-dom";

// routes
import Router from "./routes";
import { UserProvider } from "./UserContext";

const App = () => {
  return (
    <UserProvider>
      <Router />
    </UserProvider>
  );
};

export default App;
routes.js
import { useRoutes } from "react-router-dom";

// layouts
import DefaultLayout from "./layouts/DefaultLayout";
import NavbarOnlyLayout from "./layouts/NavbarOnlyLayout";

//import other pages
import NotFound from "./pages/Page404";
import Home from "./pages/Home";
import DashboardApp from "./pages/DashboardApp";


export default function Router() {
  return useRoutes([
    {
      path: "/",
      element: <DefaultLayout />,
      children: [{ path: "", element: <Home /> }],
    },
    {
      path: "/app",
      element: <NavbarOnlyLayout />,
      children: [{ path: "dashboard", element: <DashboardApp /> }],
    },
    { path: "*", element: <NotFound /> },
  ]);
}
DefaultLayout.js
import Navbar from "../components/Navbar";
import Footer from "../components/Footer";
import { Outlet } from "react-router-dom";

const DefaultLayout = () => (
  <>
    <Navbar />
    <Outlet />
    <Footer />
  </>
);

export default DefaultLayout;
NavbarOnlyLayout.js
import Navbar from "../components/Navbar";
import { Outlet } from "react-router-dom";

const NavbarOnlyLayout = () => (
  <>
    <Navbar />
    <Outlet />
  </>
);

export default NavbarOnlyLayout;
Making a dashboard
We are not going all CSS here. We will be using material-ui to make our dashboard. Still if you want to write your own CSS, rest in peace dude. Alright, we need a file to write code, inside of my-app/client/src/pages, create a new file called as DashboardApp .js. Inside the dashboard, we will be doing the following things:
- Add a new price tracker
- View the tracking history (tracking information)
- Delete the tracker
- It should be accessed only if you are logged in and it should show a logout button also.
Ok let's start making our dashboard, I think you are, I hope you are. Please! be excited. A tiny bit, a tiny tiny bit. Okay now, let's jump into the code.
First we need to import something but what needs to be imported?
import { UserContext } from "../UserContext";
import { useContext, useEffect, useState } from "react";
import { Navigate } from "react-router-dom";
import Page from "../components/Page";
import { Container, IconButton, Snackbar } from "@mui/material";
import AddNewTracker from "../components/AddNewTracker";
import AllTracks from "../components/AllTracks";
import "../components/styles/dashboardapp.css";
import CloseIcon from "@mui/icons-material/Close";
import axios from "axios";
The UserContext needs to be imported which has much more usage in the application. Import some useful classes, packages, icons, and components and a separate custom CSS for dashboardapp.css. I said we won't be using custom CSS but a tiny bit is allowed, I hope. Don't worry the CSS file only contains few style properties.
.new-tracker {
  text-align: right;
  max-width: 1000px;
  margin-top: 50px;
  padding: 20px 25px 0 0;
  background-color: #fff;
}

.new-tracker.center {
  height: 80vh;
  width: 100%;
  display: flex;
  justify-content: center;
  align-items: center;
}

.preview-window {
  margin: 25px 0 10px 0;
}
After importing the necessary components, we need to create a method that needs to be exported. Ans inside of it, we will configure some states and use some hooks. We will be using useEffect hook to fetch data from the API we have already created in our backend.
const App = () => {
  const user = useContext(UserContext);
  const [items, setItems] = useState([]);

  const [toast, setToast] = useState({
    open: false,
    message: "",
  });

  useEffect(() => {
    getItems();
  }, [toast]);

  const getItems = async () => {
    try {
      const { data } = await axios.get(`/api/tracks/user/${user.email}`);

      setItems(data);
    } catch (error) {
      console.log(error);
    }
  };

  return (
    <h1>
        Hi
    </h1>
  );
};
The user variable consists of the detail of the user, if the user is not signed in then it will be null and we will take action in this condition. The items variable consists of the tracker set by the user, if the user is new then the items will be empty. And setItems updates the state of items. We have toast which consists of the configuration of the toast that pops up when a user adds a new tracker or deletes the existing tracker. And setToast updates the state of the toast. We are fetching the trackers inside of useEffect and updating the items if the state of toast changes.
Why we are fetching data on the state change of the tracker? It is because when the user clicks add tracker, the tracker information will be sent to the database but the UI won't be updated. To update the UI, we need to fetch the data after saving it to the database. And same goes for the deleting action, if the user clicks on delete, not only the tracker should be removed from the database, the change must be reflected on the screen. And in both actions, we will be popping up the toast so making it a dependency of useEffect will be a great fit.
And we have a getItems function to fetch data. It is an async function and makes use of Axios to make a get request. One thing to note here is that we are not using the full URL, instead, I prefer to use the proxy to make API call. To set up a proxy, we need to add a line in our package.json file. Remember the package.json file which is located inside the client folder, not in the root folder. Add a proxy as
"proxy": "http://localhost:3001",
just above the dependencies. The place doesn't matter but it should be a sibling of name, dependencies, and version property. This means it would be in the same hierarchy in a tree diagram. Like this
{
  "name": "client",
  "version": "0.1.0",
  "private": true,
  "proxy": "http://localhost:3001",
  "dependencies": {
    ...
  },
  "scripts": {
    "start": "react-scripts start",
    "build": "react-scripts build",
  },
}
Now we need to check if the user is logged in or not. These three lines will do that:
  if (!user) {
    return <Navigate to="/" />;
  }
And if the user is logged in we need to return some beautiful UI for the user to interact. I have divided the UI into different components, you can find the code here. So, let's return the UI
 return (
    <Page title="App">
      <Container>
        <AddNewTracker
          className={items.length === 0 && `center`}
        />
        {items.length !== 0 && (
          <AllTracks items={items} setItems={setItems} />
        )}
      </Container>
    </Page>
  );
There are two major components, AddNewTracker and AllTracks to add a new tracker and view all of the tracker details respectively. And at last, we need to add the toast which we were discussing. We have already imported it and we can add it to the return part.
  return (
    <Page title="App">
      <Container>
        <AddNewTracker
          toast={setToast}
          className={items.length === 0 && `center`}
        />
        {items.length !== 0 && (
          <AllTracks items={items} setItems={setItems} toast={setToast} />
        )}
        <Snackbar
          open={toast.open}
          autoHideDuration={6000}
          onClose={() => setToast({ message: "", open: false })}
          message={toast.message}
          action={action}
        />
      </Container>
    </Page>
  );
Also we need a small component which the user can interact on
const action = (
    <IconButton
      size="small"
      aria-label="close"
      color="inherit"
      onClick={() => setToast({ message: "", open: false })}
    >
      <CloseIcon fontSize="small" />
    </IconButton>
  );
The DashboardsApp.js contains only this much code.
import { UserContext } from "../UserContext";
import { useContext, useEffect, useState } from "react";
import { Navigate } from "react-router-dom";
import Page from "../components/Page";
import { Container, IconButton, Snackbar } from "@mui/material";
import AddNewTracker from "../components/AddNewTracker";
import AllTracks from "../components/AllTracks";
import "../components/styles/dashboardapp.css";
import CloseIcon from "@mui/icons-material/Close";
import axios from "axios";

const App = () => {
  const user = useContext(UserContext);
  const [items, setItems] = useState([]);

  const [toast, setToast] = useState({
    open: false,
    message: "",
  });

  useEffect(() => {
    getItems();
  }, [toast]);

  const getItems = async () => {
    try {
      const { data } = await axios.get(`/api/tracks/user/${user.email}`);

      setItems(data);
    } catch (error) {
      console.log(error);
    }
  };

  const action = (
    <IconButton
      size="small"
      aria-label="close"
      color="inherit"
      onClick={() => setToast({ message: "", open: false })}
    >
      <CloseIcon fontSize="small" />
    </IconButton>
  );

  if (!user) {
    return <Navigate to="/" />;
  }

  return (
    <Page title="App">
      <Container>
        <AddNewTracker
          toast={setToast}
          className={items.length === 0 && `center`}
        />
        {items.length !== 0 && (
          <AllTracks items={items} setItems={setItems} toast={setToast} />
        )}
        <Snackbar
          open={toast.open}
          autoHideDuration={6000}
          onClose={() => setToast({ message: "", open: false })}
          message={toast.message}
          action={action}
        />
      </Container>
    </Page>
  );
};

export default App;
Configure the app
Now we will be making our app ready to be served. The last-minute configuration will be done here. We will start with .gitignore file. We don't want to push some files and folders into our repository, right? Place these lines inside of the .gitignore file.
.env

/node_modules
/client/node_modules

# production
client/build

npm-debug.log*
You can now add LICENSE.md and README.ms files. The decision is on you but I am not going to do that for now. And we need to build our client app (react app) before serving it to the users. In simple words, we need to create a production build. For that, you need to paste these commands into your terminal if you are at the root of your project.
cd client
npm run build
Now you can see a build folder inside your client folder. Now we don't need to run different servers for the frontend and the backend parts. We can do that using only one server. Place these lines inside of your indexjs file located in your root directory.
// Serve static assets if in production
if (process.env.NODE_ENV === "production") {
  // Set static folder
  app.use(express.static("client/build"));

  app.get("*", (req, res) => {
    res.sendFile(path.resolve(__dirname, "client", "build", "index.html"));
  });
}
And this is where the use of NODE_ENV variable kicks in. Don't forget to change the environment variable to production at the time of deployment.
Making the bot
We have created a web app till now for the user to interact but we need to have a program that constantly checks the price of the product and keeps a record of it. And if the price drops lower than the user's wanted price, the bot will send a professional email.
So, I have created a different program to do this thing specially. The bot should run even if no user visits our website. To achieve that create a new project. The initialization of the project will be the same. In fact, some folders will also contain the same files and almost the same code. Copy models and config folder as it is from our previous backend project.
utils
We will again have a utils folder. This folder contains the most important code of our program. Inside this folder we will have four files:
- bot.js -> this is the main file of the bot that connects other files
- fetchPrice.js -> fetches the price of the product from the website
- functions.js -> contains code to interact with a database
- sendMail.js -> used to send email
Let's start with the code:
fetchPrice.js
As mentioned above, it checks the price from the specified URL and returnss the price (in dollars). The code is almost same as we used in our backend as it does almost same thing.
import axios from "axios";
import * as cheerio from "cheerio";

const fetchPrice = async (url, site, priceLocation) => {
  try {
    const { data } = await axios.get(url, {
      headers: {
        Accept: "application/json",
        "User-Agent": "axios 0.21.1",
      },
    });

    const $ = cheerio.load(data);

    let price = $(priceLocation)
      .text()
      .replace(/([$,₹])/g, "");

    if (site == "flipkart.com") {
      try {
        const { data } = await axios.get(
          "https://api.exchangerate.host/convert?from=INR&to=USD"
        );

        price = price * data.result;
      } catch (error) {
        console.log(error);
      }
    }

    const priceArray = `${price}`.split(".");
    price = Number(`${priceArray[0]}.${priceArray[1].substring(0, 3)}`); //Validating the price

    // return current price
    return price;
  } catch (error) {
    throw error;
  }
};

export default fetchPrice;
functions.js
This file is like a controller which uses the models and contains some functions that perform actions on the database. It has four functions:
- getAllTracks() -> It fetches all tracks whose price has not yet dropped below the user's specified value and is not informed to the user via email
- getAllSites() -> It fetches the detail of all sites stored in a database
- updateHistory() -> It updates the price history every time bot fetches the price
- updateStatus() -> It update the status of the tracks from
falsetotrue
import Track from "../models/TrackModel.js";
import Site from "../models/SiteModel.js";

// Get all Tracks
export const getAllTracks = async () => {
  try {
    const allTracks = await Track.find({ informed: false });
    return allTracks;
  } catch (error) {
    console.log(error);
  }
};

// Get all Sites
export const getAllSites = async () => {
  try {
    const allSites = await Site.find();
    return allSites;
  } catch (error) {
    console.log(error);
  }
};

// update history
export const updateHistory = async (_id, history) => {
  try {
    await Track.findOneAndUpdate(
      { _id },
      { history },
      { runValidators: true, returnNewDocument: true }
    );
    return true;
  } catch (error) {
    return false;
  }
};

// update informed status
export const updateStatus = async (_id, informed) => {
  try {
    await Track.findOneAndUpdate(
      { _id },
      { informed },
      { runValidators: true, returnNewDocument: true }
    );

    return true;
  } catch (error) {
    return false;
  }
};
sendMail.js
This file used nodemailer and Zoho mail to send a professional email to the user. When I mean professional email, it is an email that looks like no-reply@yourdomain.com. In short, not a Gmail or Hotmail.
In this file, we have first created a transporter with the host, post, secure, and auth. auth contains the username and password means the actual email and the password you use while logging in to your email provider (Zoho mail). Then we have to call the sendMail method inside of the transporter to send the email with options. We have form, to, subject and html to send. We can also send simple text instead of html. The sendMail has a callback function to log errors if anything bad happens.
import nodemailer from "nodemailer";

const sendMail = (to, subject, message) => {
  const transporter = nodemailer.createTransport({
    host: "smtp.zoho.com",
    port: 465,
    secure: true, // use SSL
    auth: {
      user: process.env.EMAIL_USERNAME,
      pass: process.env.EMAIL_PASSWORD,
    },
  });

  const options = {
    from: `"${process.env.EMAIL_SENDER}" <${process.env.EMAIL_FROM}>`,
    to,
    subject,
    html: message,
  };

  transporter.sendMail(options, (error, info) => {
    if (error) console.log(error);
    else console.log(info);
  });
};

export default sendMail;
bot.js
This file joins all the puzzles of the bot. All of the individual components are connected in here. First, it fetches the tracks and sites information from database and it loops over all tracks. It scrapes, checks, update the database and send mail repeatedly (only if the condition satisfies).
import {
  getAllTracks,
  getAllSites,
  updateHistory,
  updateStatus,
} from "./functions.js";
import getPrice from "./fetchPrice.js";
import sendMail from "./sendMail.js";

const runBot = async () => {
  try {
    const tracks = await getAllTracks();
    const sites = await getAllSites();

    tracks.map(async (track) => {
      const { _id, url, site, demandPrice, history, user, type, name } = track;
      const { priceLocation } = sites.filter((s) => s.name === site)[0];

      try {
        const price = await getPrice(url, site, priceLocation);

        const newHistory = {
          price,
        };

        updateHistory(_id, [...history, newHistory]);

        if (price < demandPrice) {
          // make a custom message
          const message = `
            <h2>The price you were tracking is now in your budget. </h2>
            <br />
            <strong>${
              type.charAt(0).toUpperCase() + type.slice(1)
            } name:</strong> ${name}
            <br />
            <strong>Current price:</strong> $${price}
            <br />
            <strong>Your entered price:</strong> $${demandPrice}
            <br />
            <br />

            You can visit now and buy the ${type} <a href="${url}">here</a> before the price rises up.

            <br />
            <br />
            If the above link doesn't work then you can copy and paste this link:
            ${url}
            <br />
            <br />

            Regards, <br />
            <strong>Lootle Team <br />

            <br />
            <small>This e-mail is auto-generated from your lootle account. Please don't reply to this email as noone is watching over it. If you think this is SPAM, please report to <a href="mailto:info@aashishpanthi.info.np">info@aashishpanthi.info.np</a> for immediate action.</small>
          `;

          const titleName =
            name.length > 35 ? `${name.substring(0, 35)}...` : name;

          //mail the user
          sendMail(
            user,
            `Hurry up! The ${type}'s price of ${titleName} is low`,
            message
          );

          updateStatus(_id, true); // if mail is sent
        }
      } catch (error) {
        console.log(error);
      }
    });
  } catch (error) {
    console.log(error);
  }
};

export default runBot;
index.js
Of course, we need to set up our main file. This must be on top of the tree diagram (in the root directory).
//import dependencies
import dotenv from "dotenv";
import connectDB from "./config/db.js";
import runBot from "./utils/bot.js";

dotenv.config();

//Connect database
connectDB();

setInterval(runBot, 600000);
The index.js file looks similar to our backend's index.js file. But it runs the bot after every ten minutes.
Two more files we need to configure here are .gitignore and .env. Paste this code inside of your .gitignore file.
.env

/node_modules

npm-debug.log
.DS_Store
/*.env
And paste this inside of your .env file. And make sure to provide values to these variables.
MONGO_URI =

EMAIL_USERNAME =
EMAIL_PASSWORD =
EMAIL_FROM =
EMAIL_SENDER =
- MONGO_URI is the connection URL
- EMAIL_USERNAME is the email that will be used to login to your email provider
- EMAIL_PASSWORD is the password you use while logging in to your email provider
- EMAIL_FROM is the name of the sender like
your nameoryour team name - EMAIL_SENDER is also the email of the sender
Oh, I forgot about the dependencies. You can install all of the bot dependencies with this command:
npm i axios cheerio dotenv mongoose nodemailer
Run the application
Lastly, if you want to run the application, there are simple processes to follow. If you want to run the bot, go to the root directory of the project and use this command:
node index.js
If you want to run the MERN app on production, you only need one command. Go to the root directory of the project and use this command.
node indedx.js
Note: you should first make a production build for the production environment. And also change the .env variable.
And if you are still in the development stage, you need to run separate servers for the frontend and backend. To run the frontend part (react app), you need to go inside of client directory and start the app as:
cd client
npm start
And to start the express server (backend server), run this command from the root directory.
node index.js
PWA
Remember, how we initiated our react app? We want to make a progressive web app. Inside our client folder, we have an src folder and inside the src folder, you should see a service-worker.js. We don't need to interfere with this file unless you are crazy. Inside our index.js file, we should change serviceWorkerRegistration.unregister() to serviceWorkerRegistration.register(). This is how our index.js file looks afterwards:
import React from "react";
import ReactDOM from "react-dom/client";
import App from "./App";
import * as serviceWorkerRegistration from "./serviceWorkerRegistration";
import "./index.css";
import { BrowserRouter } from "react-router-dom";
import { GoogleOAuthProvider } from "@moeindana/google-oauth";

const root = ReactDOM.createRoot(document.getElementById("root"));
root.render(
  <GoogleOAuthProvider clientId={process.env.REACT_APP_GOOGLE_CLIENT_ID}>
    <BrowserRouter>
      <App />
    </BrowserRouter>
  </GoogleOAuthProvider>
);

// PWA
serviceWorkerRegistration.register();
Be sure to make a new production build after this step to see the effect of PWA.
Resources
Here are some resources that might help you.
Conclusion
This was probably not a quick process to make an app. But there are a lot of things to learn from this article. Scrapping the data, sending an email with nodemailer and Zoho mail. Signing in with google and of course reading this whole article is a great thing. I am not saying this is a perfect way to make a MERN app or run a bot. If you know a better way, it would be great if you can suggest me. This app is an open-source app, anytime you can fork an app and send a pull request. If you want, we can have a chat on Twitter.


